
|
Print address label, cards and more.
Get data from MS Excel, MS Access and print on your labels! |
|


|
||
Take Video Tutorials for our products to find out most of your answers. It is a step by step guide to show you how you can do most of work. It's easy, it's fun, just click and watch!
Some Questions and Answers - May help you!
- What payment options are available?
- What currencies do you accept?
- How can I place an order?
- What will happen after I place my order?
- When will I receive my product?
- How do I get any special discounts?
- How can I place a purchase order?
- How will the charge appear on my credit card /debit card statement?
- Can I get the product on a CD-ROM?
- When will I receive my CD-ROM on Demand?
- What will I receive if the product is delivered by e-mail?
- How secure is my online order?
- Will my personal data be shared with any third parties?
- Can I save my card as PDF file or Image file?
- I see a slight misalignment while printing. What are the other ways to print?
- How do I add/remove back side of my card?
- How do I print back side of my card?
- Why do the shadows not show up even if I choose 'show shadow' on the properties window?
- Can I create a vertically aligned card or a custome size business card?
- I choose a background color, but doesn’t show up. Why?
- I saved my design as a template, but does not show up in the "New Card Template" window. What's wrong?
- I closed the property window. How do I get it back for changing the properties(color, size, tilt angle etc.) of an element?
- How can I send my design to someone by email who does not have this software?
- How do I use new font with the application?
- I cannot move or resize some elements in my design. Why?
- I have some elements that are outside the design area. Will they show up on my printed card?
- What graphic file formats are supported by Belltech Business Designer Pro?
- How do I use an image file that is in an unsupported format?
- What type of paper do I buy to print business cards?
- 'Save as Image' does not save the background image. How do I do it?
- I would like to save my card as a high resolution image and then get it printed from a printshop. How can I do this?
- After entering text or in print i see dots appearing, not the whole text. How can I fix this?
- How can i add ©, ®, TM, bulletted item list or other symbols?
- How do I change the size of a photo or text or any element?
- How do I use my letterhead with Microsoft Word document?
- How do I print a list of name badges on the same page?
- I closed the property window. How do I get it back for changing the properties(color, size, tilt angle etc.) of an element?
- How can I send my design to a printshop for professional printing?
- How do I use new font with the application?
- How do I use an image file that is in an unsupported format?
- How do I print only one label at a specified location on my sheet?
- How do I connect to my data files?
- What types of data files are supported?
- I want to print address labels from my Excel files. Do I need to know SQL?
- How do I convert my date to format like January 5, 2005 or 01/05/2005 etc.?
- How do I join 2 fields into one. Like FirstName, LastName into one single line, or Addrs1, addrs2 into one field?
- How do I add automatic label counter, like 1 of 100, 2 of 100 or 1/100 ?
- How can I pull data from 2 or more sheets from a single Excel file?
- How do I connect to my data files, Access or Excel sheet?
Please refer to CaptureXT help pages.
You can also send us a Personal or Company Checks, Money Orders for your purchase. To do that please send your Checks/Money Orders to this address with details:
Belltech Systems
4580 Klahanie Dr. SE # 245
Issaquah
WA-98029, USA

Q. What currencies do you accept?
US Dollars, Euro, Pound Sterling, Australian Dollars, Japanese Yen, Canadian Dollars or Swiss Francs.
Q. What will happen after I place my order?
Please make sure that you are not blocking emails from belltechsystems.com.
Q. When will I receive my product?
Q. How do I get any special discounts?
Q. How can I place a purchase order?
Belltech Systems
4580 Klahanie Dr. SE # 223
Issaquah
WA-98029, USA
Please contact us for any questions.
Q. How will the charge appear on my credit card /debit card statement?
Q. Can I get the product on a CD-ROM?
Q. When will I receive my CD-ROM on Demand?
Q. What will I receive if the product is delivered by e-mail?
You will also receive user guide documentation, extra graphics and templates for some products. Please make sure that you are not blocking emails from belltechsystems.com.
Q. How secure is my online order?
Q. Will my personal data be shared with any third parties?
Xbox+bios+files+xemu <Windows Updated>
If successful, you will see the classic green “XBOX” animated boot screen. If you see a black screen or a purple error message, your BIOS files are corrupt or mismatched.
The original Xbox (2001) was a console that redefined home gaming, but its hardware is notoriously unreliable. Capacitors leak, DVD drives fail, and hard drives lock up. Enter Xemu – the open-source Xbox emulator that allows you to play classics like Halo: Combat Evolved, Jet Set Radio Future, and Panzer Dragoon Orta on your Windows, Linux, or macOS PC.
However, unlike emulators for older systems, Xemu cannot run a single game without a critical component: Xbox BIOS files.
If you have searched for "xbox bios files xemu" and found a maze of confusing terminology (MCPX, Complex, 4034) or legal warnings, this guide is for you. We will explain exactly what these files are, why you need them, where to legally obtain them, and how to configure them for optimal performance.
| Symptom | Likely Fix |
| :--- | :--- |
| Black screen immediately | Wrong MCPX file – try the other variant (Complex_4627v1.03.bin vs mcpx_1.0.bin). |
| Error 07, 09, or 11 | Missing hard drive image – go to Settings → System → Hard Disk → Create a new .q cow2 image. |
| Purple screen with error code | Kernel mismatch – you need xbox-4627.bin, not a later version. |
| Sound but no video | Enable “CPU Scaling” in Settings → Video → Output scaling. |
Emulation technology is rapidly advancing, and while setting up an environment for Xbox emulation can seem daunting, the process can be rewarding, allowing you to revisit classic games on modern hardware. Always follow best practices for obtaining and managing your files to stay within legal boundaries.
An essential part of setting up the xemu emulator is acquiring the correct Xbox BIOS files, as the emulator requires a system image to initialize the virtual hardware and boot games. Understanding Xbox BIOS Files for xemu
The BIOS (Basic Input/Output System) is the low-level firmware that tells the Xbox hardware how to start up. For emulation, xemu cannot use a standard, unmodified retail BIOS because those are designed to only run signed, official Microsoft code. Instead, you need a modified retail BIOS or a debug BIOS that allows for unsigned software to boot.
According to the official xemu documentation, the most widely recommended version for compatibility is the "COMPLEX 4627" BIOS. Essential Files Required
To get xemu running, the BIOS is just one piece of the puzzle. You will need a total of four specific system files:
Flash ROM (BIOS): Typically a 256KB or 1MB file (e.g., complex_4627.bin).
MCPX Boot ROM: A tiny 512-byte file that initializes the processor.
Hard Disk Image: A pre-formatted virtual disk (often xbox_hard_disk.qcow2) used to store the Xbox dashboard and save data.
EEPROM: A small 256-byte file containing system-specific settings like video output and region. Legal and Safety Considerations
It is important to note that BIOS files and Boot ROMs are copyrighted material owned by Microsoft. Distributing these files is illegal, which is why they are not bundled with the xemu emulator.
Sourcing: Users are legally expected to dump these files from their own physical Xbox console using homebrew tools.
Caution: Avoid downloading "BIOS packs" from untrusted websites, as these files can often be corrupted or contain malware. How to Configure BIOS in xemu
Once you have dumped your files, setting them up is straightforward: Open xemu and navigate to Settings > General. In the Flash ROM field, browse and select your BIOS file. In the MCPX Boot ROM field, select your boot ROM file. Specify the paths for your Hard Disk Image and EEPROM. Restart the emulator to apply the changes.
The xemu project is open-source and available for Windows, macOS, and Linux, providing a powerful way to preserve and play classic Xbox titles in high definition.
To run the xemu Original Xbox emulator, you need a specific type of BIOS file because the emulator cannot boot games using an unmodified retail BIOS due to unimplemented DRM functions. Required BIOS Files xbox+bios+files+xemu
You must use either a debug BIOS or a modded retail BIOS that is capable of booting unsigned software.
Recommended BIOS: The xemu official documentation notes that users have the most success with the "COMPLEX 4627" modified retail BIOS.
Other Options: Other popular "scene" BIOS files (like EvoX M8+ or Xecuter 2) may also work, provided they are in a compatible .bin format. Other Essential Files
In addition to the BIOS, xemu requires two other system files to function:
MCPX Boot ROM Image: Usually named mcpx_1.0.bin. This is the initial code that runs when the Xbox starts.
Hard Disk Image (.qcow2): A virtual hard drive file containing the Xbox dashboard and system files. You can find instructions on creating or downloading a pre-built image on the xemu Hard Disk Image guide. Legal Note
These files are copyrighted material belonging to Microsoft. You should legally dump them from your own physical Original Xbox console using tools like XboxDev's dumping guide. Distribution of these files is generally prohibited on official forums and repositories.
(the original Xbox emulator) up and running, you need specific system files that are not included with the software for legal reasons. 🛠️ Required BIOS & System Files
You cannot start the emulator without these three components: Flash ROM (BIOS): A 256KB, 512KB, or 1MB image. Recommendation: Most users have the best results with the "Complex 4627" You must use a debug BIOS modded retail BIOS capable of booting unsigned software. MCPX Boot ROM:
A tiny (512 byte) file required for the initial boot sequence. Hard Disk Image (HDD): A pre-formatted file that acts as the console's internal hard drive. 📂 Where to Put Them Once you have the files, you must link them in the Click the browse buttons to select your MCPX Boot ROM Hard Disk Image the emulator. 🎮 Game Compatibility xemu requires games in format, specifically (Cross-platform ISO). Standard ISOs:
Regular disc images from your PC will not work; they must be converted or "scrubbed" to the Xbox-specific format. You need an OpenGL 4.0 compatible GPU. ⚠️ A Note on Safety
Downloading BIOS files from the internet is technically a legal gray area. The official stance of the is that you should dump these files from your own physical Xbox console If you'd like, I can help you with: compatibility list for specific games. The steps to convert standard ISOs to xiso format. Troubleshooting graphics settings for better performance. How would you like to proceed with your setup Original Xbox Emulation Ultimate Guide - XEMU Emulator
To set up the xemu emulator, you specifically need a modified retail BIOS or a debug BIOS, as a standard retail BIOS will not boot games due to DRM restrictions. 📂 Essential BIOS Requirements
The community consensus, highlighted by the xemu official documentation, points to these specific needs:
Modified BIOS: The most compatible choice is typically the COMPLEX 4627 BIOS.
Alternative: The Ind-BIOS 5003 is also frequently cited for high compatibility.
MCPX Boot ROM: You need the mcpx_1.0.bin file (the 512-byte bootstrapper).
Format: Ensure your BIOS file is exactly 256 KB, 512 KB, or 1024 KB. 🛠️ Configuration Tips
File Placement: You can point to these files in the xemu settings under System > Flash ROM and Boot ROM. Click Save and restart Xemu
Hard Disk Image: Don't forget you also need an xbox_hard_disk.qcow2 file to save game data.
Legality: You should legally extract these files from your own physical Xbox console. 💡 Community Insight
If you'd like, I can help you find a step-by-step guide on how to: Extract these files from your original console. Format a virtual hard drive for xemu. Convert your physical discs into ISO files for emulation.
To run the xemu emulator (an open-source project for original Xbox emulation), you need specific system files extracted from an actual Xbox console. Because these files are copyrighted by Microsoft, they are not bundled with the emulator. Required Files for xemu
To get the emulator to a bootable state, you must provide the following four components:
MCPX Boot ROM: A 512-byte file (usually mcpx_1.0.bin). This is the first code the Xbox hardware executes upon power-up.
Flash ROM (BIOS): A 256KB or 1MB image of the Xbox system software (e.g., Complex_4627.bin or an official retail BIOS). This handles the kernel and hardware initialization.
Hard Disk Image (VHD): A pre-formatted virtual hard drive containing the Xbox dashboard and file system.
Game Media: Games must be in .dotno or .iso (specifically XISO) format to be readable by the emulator. Where to Find Them
Legal Method: The intended way to obtain these is by dumping them from your own original Xbox console. This requires a softmodded or hardmodded Xbox and tools like XboxUtils to extract the BIOS and MCPX data.
Compatibility: Ensure your BIOS version is compatible with xemu. Most users prefer "Complex" or "Ind-BiOS" images for better compatibility with homebrew and backups. Setup Process
Download xemu: Get the latest version from the official xemu website.
Configure Paths: Open xemu, go to Settings > General, and point the emulator to your mcpx_1.0.bin, your BIOS file, and your Hard Disk Image.
Restart: Once the paths are set, click Machine > Reset. If successful, you will see the iconic green Xbox startup animation.
It was a typical Friday evening for John, scrolling through his favorite tech forums, searching for the latest updates on his beloved Xbox. As an avid gamer and retro gaming enthusiast, John had spent countless hours exploring the world of Xbox emulation, particularly with xemu, an open-source emulator that allowed him to play Xbox games on his PC.
As he browsed through the threads, one post caught his attention: "New BIOS files for xemu released!" The poster claimed to have obtained a set of rare, previously unreleased BIOS files for the original Xbox, which would supposedly improve compatibility and performance on xemu.
Intrigued, John quickly navigated to the attached repository and began to download the files. As he waited for the download to complete, he read through the README file, which explained the installation process and warned about potential risks.
With the files finally in hand, John carefully followed the instructions, making sure to backup his existing xemu configuration and BIOS files. He then replaced the old files with the new ones, restarted xemu, and loaded his favorite game, "Halo: Combat Evolved."
To his delight, the game launched flawlessly, with improved graphics and a smoother frame rate. John spent the next few hours exploring the game's world, marveling at the enhancements brought by the new BIOS files. If successful, you will see the classic green
However as the night wore on, John began to experiment with other games, loading up "Counter-Strike" and "Fable." While the results were mostly positive, he encountered some minor issues with audio synchronization and controller input.
Determined to troubleshoot, John dove deeper into the xemu configuration, tweaking settings and consulting the documentation. After a few more hours of trial and error, he finally managed to resolve the issues, achieving a near-perfect gaming experience.
As the sun began to rise, John leaned back in his chair, reflecting on the journey he'd undertaken. The new BIOS files had not only improved his gaming experience but also reignited his passion for Xbox emulation and retro gaming.
With a satisfied smile, John closed his laptop, already looking forward to the next update, and drifted off to sleep, his mind filled with the endless possibilities of xemu, Xbox, and the world of retro gaming.
Title: "Unlocking the Power of Xbox: A Guide to BIOS, Files, and xEMU"
Introduction
The Xbox is a legendary gaming console that has been entertaining gamers for decades. While it's no longer supported by Microsoft, the Xbox community remains active, and enthusiasts continue to explore new ways to play classic games. In this post, we'll delve into the world of Xbox, BIOS, files, and xEMU, a popular emulator that allows you to play Xbox games on your PC.
What is BIOS?
BIOS (Basic Input/Output System) is firmware that controls and configures the hardware components of a computer or console. In the case of the Xbox, the BIOS is responsible for initializing the console's hardware, detecting storage devices, and loading the operating system. The Xbox BIOS is specific to each console model and contains essential code that enables the Xbox to function.
Xbox BIOS Files
Xbox BIOS files are essential for emulating the console on a PC. These files contain the firmware that allows the emulator to mimic the Xbox's behavior. There are different BIOS files for each Xbox model, and they can be downloaded from various sources online. However, be aware that downloading and using BIOS files may be subject to copyright and intellectual property laws.
What is xEMU?
xEMU is a popular open-source emulator that allows you to play Xbox games on your PC. It's designed to be highly compatible with a wide range of Xbox games and offers features like save states, cheats, and controller support. xEMU is constantly being updated and improved by its developers, making it an excellent choice for gamers who want to experience classic Xbox games on their PC.
How to Use xEMU with Xbox BIOS Files
To use xEMU, you'll need to obtain a valid Xbox BIOS file and configure the emulator to use it. Here's a step-by-step guide:
Conclusion
In this post, we've covered the basics of Xbox, BIOS, files, and xEMU. By understanding how these components work together, you can unlock the full potential of your Xbox and play classic games on your PC. Remember to always respect intellectual property laws and use BIOS files and game ROMs responsibly.
Additional Resources
Troubleshooting Tips
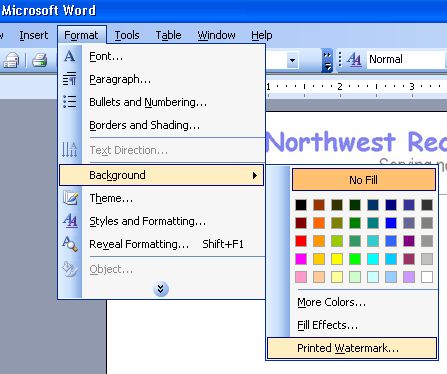
2.Open MS Word(*.doc)
3.In Word Doc, go to menu: Format->Background->Printed Watermark
4.Select a the letterhead image that you saved in step 1.
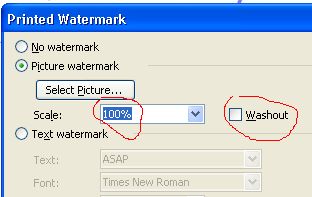
5.Choose scale 100% and uncheck Washout option. Click OK. You are done.
Q. How do I print a list of name badges on the same page?
Senario-1: You want to print multiple badges with different names.
Solution:
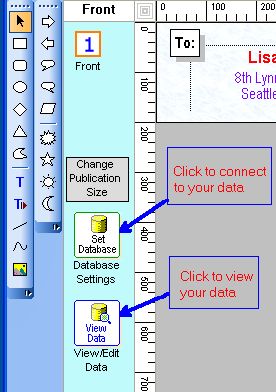
1. You must first have the list of names in a text file or Excel sheet or in a database file.
2. Then you need to connect your datafile as shown here - data connection
If you don't know how to create the txt/csv/xls file, check out these samples:
a. data in plain text file - sample-name-address.txt
b. data in Excel sheet - sample-name-address.xls
c data in csv file - sample-name-address.csv
Senario-2: You want to print multiple badges with same names.
Solution:
Just design one badge and then go to File->print menu and select how many you want to print.
Q. I closed the property window. How do I get it back for changing the properties(color, size, tilt angle etc.) of an element?
Q. How can I send my design to a printshop for professional printing?
Q. How do I use new font with the application?
Q. How do I use an image file that is in an unsupported format?
Q. How do I connect to my data files?
You can also click on menu: File-->Database Settings to set up your data files.
Then go to menu: Insert-->Text From Database to insert a text.
Q. I want to print address labels from my Excel files. Do I need to know SQL?
For most cases SQL knowledge is not required.
Steps to use excel data source:
1. Click on menu: File->Database settings. A Datasource Window appears.
2. Select excel option and browse to your excel file.
3. Now you will see a dropdown with all the excel sheets in the excel file.(an excel file may have one or many sheets)
4. Select the execl sheet you want from the dropdown.
5. Click ok.
At this point you have connected to your excel sheet with your work.
Now go to menu: insert->text from database, and insert an element to your design work. Then go to righthand side's properties area and see a drop down with all the columns in your selected excel sheet. Choose one column and you are done.
Then take a printpreview from file menu.
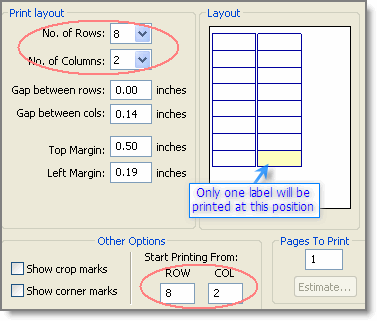
Q. How do I print only one label at a specified location on my sheet?
Then you choose this option in print window:
No. of rows=8
No. of cols=2
Start printing from row=8, col=2.
See illustrated image. The postion marked yellow will only be printed.
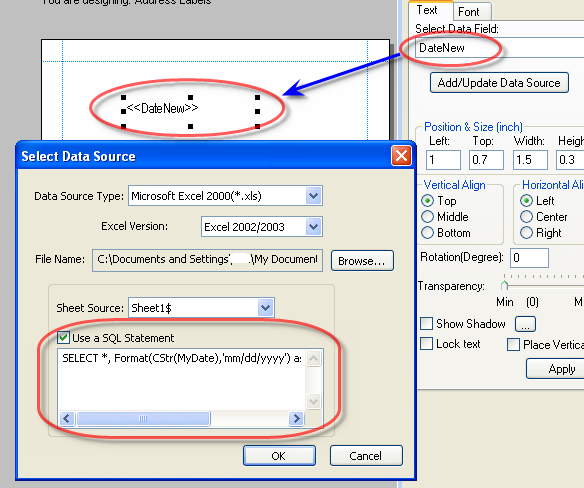
Q. How do I convert my date to format like January 5, 2005 or 01/05/2005 etc.?
SELECT * Format(CStr(MyDate),'mmmm dd, yyyy') as DateNew FROM [Sheet1$]
[This will convert the date to this format: January 5, 2005]
SELECT Format(CStr(MyDate),'mm/dd/yyyy') as DateNew FROM [Sheet1$]
[This will convert the date to this format: 01/05/2005]
You can use many other format strings like Format(CStr(MyDate),'m/d/yy'), Format(CStr(MyDate),'m-d-yy'),Format(CStr(MyDate),'mm-dd-yyyy') etc. Put the SQL statement in the text box as show below:
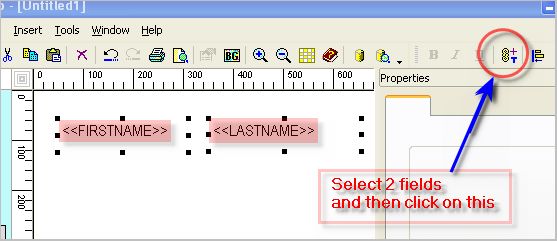
Q. How do I join 2 fields into one. Like FirstName, LastName into one single line, or Addrs1, addrs2 into one field?
Step 1:
Select the 2 fileds(example FirstName, LastName) you want to join by holding "Ctrl" Key and clicking on them.
Step 2:
Then click on the tool button as shown, or select from menu: Tools->Merge selected DB-Texts Select
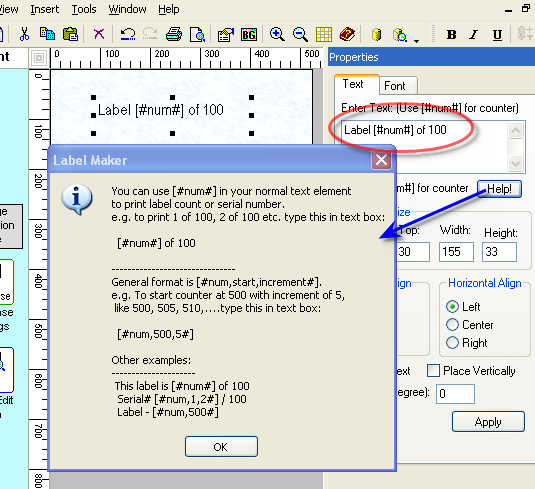
Q. How do I add automatic label counter, like 1 of 100, 2 of 100 or 1/100 ?
SELECT [SheetName$].Name, [SheetAddress$].Address FROM [SheetName$] , [SheetAddress$] where [SheetName$].ID=[SheetAddress$].ID
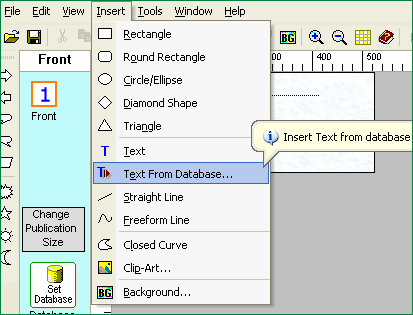
Q. How do I connect to my data files, Access or Excel sheet?
Click on menu: File-->Database Settings to set up your data files.
Steps 2:
Then go to menu: Insert-->Text From Database to insert a text as shown.
Steps 3:
Then click on the text. You will see "<<TextFromDB>>" .
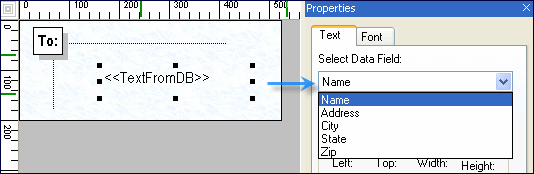
After that you will see a dropdown in the properties area. In the dropdown you will see all the columns
that your Access Table or Excel Sheet has. Select the column(e.g. Name) to show in this text element.
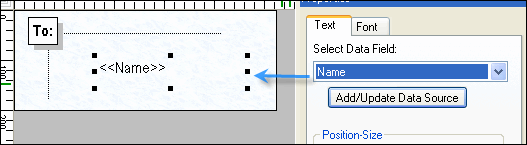
Steps 4:
Repeat step 2 and 3 to select other columns (e.g, Address, City etc.)
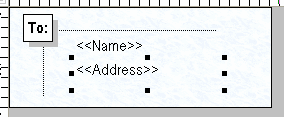
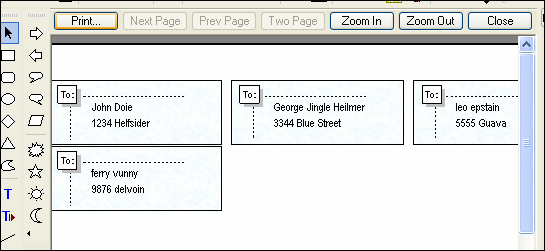
Steps 5:
Go to menu File->Print Preview to see a preview as shown.
If things look fine, print your labels.
|
|
|
home Crossroad World © 2026 | buy | products | services | support | privacy policy | |
|
Copyright © 2001-2009 Belltech Systems, Inc. All rights reserved
|